|
|
Post by Admin on Oct 13, 2021 9:50:19 GMT -7
There has been a lot of discussion over the years about rotary problems. With the variety of "normal" RPM's on rotary tumblers, it could cause a lot of confusion for some, especially those who are unaware of what different speeds can do to rocks. The practice of designing machines for limited longevity and performance is common practice. For starts any continuous duty machine designed with bushings is a dead giveaway for such unscrupulous practice. Don't shoot the messenger but it is true. There is enough complication with the tumbling process to not have to wrestle with your tumbler's reliability. Building a homemade using industrial grade pillar blocks, solid steel shafts, automotive grade v-belt, sheaves, lumber and a real motor is not so difficult or expensive.
For serious tumbling folks I certainly recommend spending the time and money.Keep in mind the grip on the barrel increases when the gap between the shafts are wider. A 7 inch barrel sitting on a 6 inch gap between the shafts has more grip than a 7 inch barrel sitting on a 3 inch gap between the shafts - Due to wedge force. Keep in mind the grip on the barrel increases when the gap between the shafts are wider. A 7 inch barrel sitting on a 6 inch gap between the shafts has more grip than a 7 inch barrel sitting on a 3 inch gap between the shafts. Due to wedge force. Is there a sweet spot for shaft spacing. Not my area of expertise but at some point wouldn't the wider spacing put more stain on the belt and motor?. Thinking more grip equals more stain somewhere in the build. My home made tumblers have all used Lortone barrels so I went the easy route and copied their standard shaft spacing. Chuck |
|
|
|
Post by Admin on Oct 13, 2021 9:53:13 GMT -7
There have been a few threads recently related to barrel speed and rotary tumblers. I've paid attention to all of them, as my rotary tumblers have seemed to be slowing down over time. My belts seem to be OK, so I was left with if the motor was getting tired. After seeing input from a bunch of diffrerent folks, I decided to take measures to increase barrel RPMs without worrying about belt tension and such. Without trying to play with belt tension, I thought I would work on working with the diameter of my drive shaft on my rotaries. For illustration, I'll refer to a Lortone 45C. My 45C rotary barrels had slowed down to about 31-32 RPMS. Belt tension appeared to be OK, but Lortone recommends this tumbler turning at 34 RPMs. So I simply looked to build up the diameter of the drive shaft to increase RPMs- and I did so by adding rolls of electrical tape on the shafts to increase barrel RPM. I've added the tape along the shaft (about 10 wraps), and my barrels are now turning at about 40 RPMs. This is my first venture at this speed, so it will be interesting to see if I get more fractures and such. Just thought I'd throw this out there for folks who might want to get more barrel speed with an easy fix. A photo is attached. 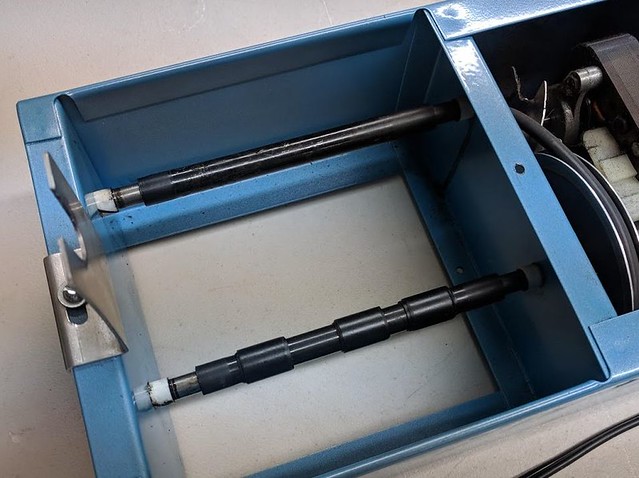
|
|
|
|
Post by Admin on Oct 13, 2021 9:56:39 GMT -7
That looks like a great modification. If there are issues with fractures at the higher RPM then adding rocks may solve that. If you are were filling up to 75 percent bump it to 85 percent with the higher speed. Just a thought. Chuck Thanks Chuck, I can also go the other route and start removing wraps if need be to slow things down a bit. It's just an experiment for now, so it's hard to say how this will go. It will be interesting to see how this works out. I have one barrel in polish and another in the medium stage with the new RPMs. Thanks for your input. |
|
|
|
Post by Admin on Oct 13, 2021 9:57:49 GMT -7
@jamesp has a lot of experience with varying RPMs. If I remember correctly back when he was tumbling just rocks he used higher rpm for coarser grits and slower rpm for polishing. Chuck If I recall correctly, his barrel speed was far more than what I'm turning right now. I don't recall his barrel size, but the RPMs were pretty high. With all of the discussions about barrel speed thus far, I've come to the conclusion that all barrels are not created equal. Some are smooth walled, some are PVC, some are hex walled, and some are more narrow than they are wide, proportionally, when it comes to rocks that are going inside. I think all of these factors come into play at one level or another. I've really come to believe that each barrel type has its own sweet spot when it comes to rolling rocks. It just takes some experimenting to find where that spot is. I'm hoping I'm on track with what I'm doing now. It will be interesting to see what happens. |
|
|
|
Post by Admin on Oct 13, 2021 9:58:53 GMT -7
I am all about 2 rotary speeds. ** Speeds are for all 6 inch inside diameter barrels. 85 RPM for coarse grind. 30 RPM for all other steps. The 30 RPM speed using 220-500-1000-polish steps is the standard 75% barrel fill. Right by the book. Focusing on coarse grind using 6 inch inside diameter barrels at 85 RPM: 1) Coarse grind is the longest step in about all cases except possibly softer than Mohs 7 rocks. 2) My home made machine was sorta accidentally designed for easy pulley ratio changes for different speeds. 3) Over a period of 7 years I bought pulleys to increase from 30 to 45 to 62 and finally settled at 85 RPM. 4) Keep in mind this tumbler is stout and built with heavy components and handles these speeds easily. Conclusion was higher speeds are not a problem if you increase barrel fill from 75% to 85/90% fill. The added speed simply grinds faster, uses abrasive faster and requires less run time and electricity. The key is filling the barrel higher to 85%+ meaning you are tumbling more rocks. Keep in mind a half full barrel uses more electricity than a 3/4 or 7/8 full barrel because it is not balanced(think water wheel). And this high barrel fill allows tumbling the most delicate shapes and materials because there is less fall in the barrel. And a thin slurry becomes less of an issue because of the high mixing rate at higher speed. However an overly thick slurry does become a problem so more clean outs or pouring slurry off and adding water to thin is required more often. Speaking of delicate, these are some really thin long pieces of glass that were shaped at 85 RPM. Very rarely do these break at 85 RPM/85% barrel fill. 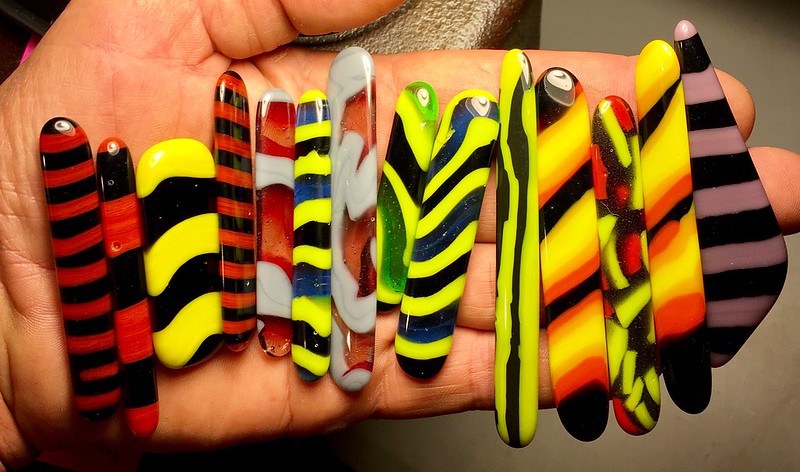 Even more delicate these glass 'toothpicks'  I actually broke more long thin pieces of glass at 30 RPM when doing the SiC 500 step(I skip SiC 220). And the reason for the breakage was that the SiC 500 was more aggressive on glass than imagined. I started with 75% barrel fill at 30 RPM, after 4 days the glass had worn too much and gotten too thin and the barrel level had dropped to 50% fill which chipped my glass. So I had to stop coarse grind early to allow for the SiC 500 step to run long enough (7 to 10) days to breakdown without wearing my glass cabs too thin. But glass is soft and SiC 500 chews away at it much quicker than imagined. I have run over 50 six to twelve pound loads of glass in 2018 with the exact same SiC 60 and SiC 500 rotary recipe. Then to vibe. However aluminum oxide 500 had the exact opposite effect than that of SiC 500. It removed little material, much less aggressive. |
|
|
|
Post by Admin on Oct 13, 2021 10:00:19 GMT -7
Interesting experiment. Here is a question. Why do the speeds vary so much on different brands of rotary tumblers? MY duel 3 lb. CE averages about 65 RPM's. This speed varies, depending on the weight in the barrels. When a want a faster speed (as @jamesp recommended for some coarse grinds), I now place on an empty barrel. This causes both to rotate at higher speed. The full barrel is at about 85% capacity. 20-30-40-50-60 RPM. Any of those speeds will do the job of tumbling @fernwood. Take it to extremes, if you have a 4 foot tall barrel spinning at your 65 RPM the outside of the barrel is screaming fast. Too fast. So the tumbling speed should get slower as the barrel gets bigger. Perhaps product liability insurance comes into play if a company were to sell a 50 pound tumbler spinning at 65 RPM. If you got your finger caught in it a bad day would certainly happen. The work formula is certainly simple, just ask the boss. There is two ways to increase the amount of work you do on your rocks keeping your machine the same(except speed) and all else constant. Increase the time tumbled Increase the speed tumbled If your speed is changing with weight you may have slippage somewhere. AC motors will overheat if their 'rated' speed changes by just a few percent. I think it is about 5%. |
|
|
|
Post by Admin on Oct 13, 2021 10:02:13 GMT -7
I simply looked to build up the diameter of the drive shaft to increase RPMs- and I did so by adding rolls of electrical tape on the shafts to increase barrel RPM. I had thought about doing something similar with heat-shrink tubing, but your tape idea has two advantages: 1. It doesn't require disassembling the tumbler 2. Easy to change the speed by removing/adding a few layers. I'm not sure of the longevity of electrical tape, so I'll use cloth tape if I try this. |
|
|
|
Post by Admin on Oct 13, 2021 10:04:55 GMT -7
]My guess is that the slowing of the barrel is related to slippage. Either the belt on the pulley's or the barrel on the drive shaft. The drive shaft looks a bit polished so that might lead to slippage. Adding the tape provided a new non-polished contact for the barrel thus increasing the friction and eliminating the slippage. You may have something there with the condition of the shaft. I've been monitoring belt tightness, and all has seemed to good there. In the past, If I start to get some slippage, I can usually see belt residue on the pulleys or inside the tumbler housing. There's been no residue up to this point in time. But, since you mention it, the shaft does look pretty polished, and I've flat out missed that - even though I look at it all the time. I'll let things ride with the tape right now, just to see how the loads go at the current RPMs the barrels are turning. If I find that the tape needs to go for whatever reason, I'll definitely make a point of cleaning/scuffing both the shafts and the barrels. Thanks.  |
|
|
|
Post by Admin on Oct 13, 2021 10:05:59 GMT -7
Keep in mind the grip on the barrel increases when the gap between the shafts are wider. A 7 inch barrel sitting on a 6 inch gap between the shafts has more grip than a 7 inch barrel sitting on a 3 inch gap between the shafts. Due to wedge force. Is there a sweet spot for shaft spacing. Not my area of expertise but at some point wouldn't the wider spacing put more stain on the belt and motor?. Thinking more grip equals more stain somewhere in the build. My home made tumblers have all used Lortone barrels so I went the easy route and copied their standard shaft spacing. Chuck |
|
|
|
Post by Admin on Oct 13, 2021 11:33:17 GMT -7
The only other random thing I can think of that hasn't been mentioned here is load composition. I generally run ~50% total volume or more small ceramic media depending on the assortment of rock I'm tumbling. The only times I've had impaired movement not due to the load being too wet/dry has been when I had too much rock or too many large rocks. I may not be maximizing my yield but I'm happy with the results. Good point, and that's one of the things on my list to try. Right now I'm at about 30% mixed ceramics. When I get a chance, I was going to fill the barrel with ceramics that have gone all the way through polish to see how those are impacted with water only. Problem is, if the load does turn (as opposed to rocks and ceramics), I don't know if I can make the call yet to say it was exclusively a fill issue, though it will be a start. Thanks for reminding me. |
|
|
|
Post by Admin on Oct 13, 2021 11:42:14 GMT -7
The only other random thing I can think of that hasn't been mentioned here is load composition. I generally run ~50% total volume or more small ceramic media depending on the assortment of rock I'm tumbling. The only times I've had impaired movement not due to the load being too wet/dry has been when I had too much rock or too many large rocks. I may not be maximizing my yield but I'm happy with the results. This exactly, would be my only comment. Larger rocks, or funny shaped oblong rocks, have a adverse effect on the load. I use a different model vibratory tumbler though, which, oddly enough, does not need any grit at all for proper locomotion. But when I have problems with speed or motion, it is always related to funny shaped, larger rocks (and too many of them) that I am trying to run.
I have since dedicated one of my 6 lb. rotaries to tumbling larger, funny shaped or oblong rocks. Takes forever, but the end result (as I am sure you are well aware of) is still a great looking polished rock.
I realize that I am too new to be commenting here, but thought I would add this only.
|
|
|
|
Post by Admin on Oct 13, 2021 11:53:56 GMT -7
Hi Dave Does Lot-O use 2 flat springs stacked on top of each other ? I can not recall. It looks like 2 stacked in this photo. I think Lot-O uses common banding material for their spring stock. It may be that they moved to a different supplier and the banding material is softer or harder. The springs in the photo look a more silver color, could be lighting or reflection. My springs are like gun blue color. I had a broken spring. It was not easily noticeable for some reason(memory gone). Maybe the springs were stacked and one of the two springs was broken completely in half so it was not noticeable. Maybe replacing the springs if the dowel movement does not work would be an route to take. I will keep a spare set regardless. Note the dowel position at the bottomt. 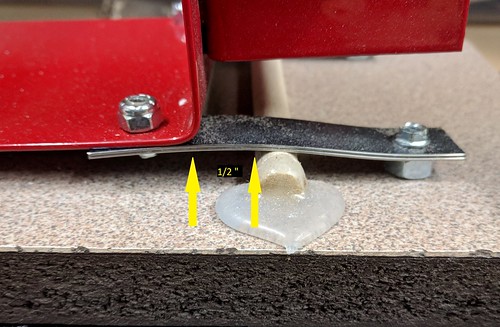 |
|
|
|
Post by Admin on Oct 13, 2021 11:58:19 GMT -7
My bet is on the dowel placement. I just feel bad for anyone who buys a poorly tuned Lot-O but doesn’t have a support group or a video to realize that it is not working properly. Who would ever think to move the dowel? (Long post. For those who think it's TLDR, the summary is a slow moving Lot-O may be assisted by moving the dowel closer to the vertical upright of the frame.) Rob, I totally agree with you. Heck, I wouldn't have even known about the Lot-O if I hadn't ventured here in the first place. But, that said, the ability to go to the 'net and here really made me question how well my Lot-O was circulating material. Based upon what I'd seen, I was skeptical at the outset. With that skepticism, I contacted the Lot-O folks looking for help in how to deal with my "seemingly" slow circulating machine. Compared to everything I'd seen on the internet, my machine turned stuff much slower. In my contact with those folks, I was told that each machine was "eyeballed" (my quote) to establish where the dowel should be placed. A test barrel was inserted into the frame, and when the tester was happy with circulation, the dowel was glued in place. As I mentioned in another post, it's not rocket science. But, I was told that I could move the dowel, but I'd no longer have any warranty for the springs. OK, whatever. After that phone call, I struggled with my batches. While I could ultimately get through them, I found myself wondering why others have not expressed the same concern that I have. Fast forward to now. After not being able to complete a polish stage without material coming to a standstill near 18 hours, I decided to move the dowel. So far, that's the best thing I've done. I restarted my polish stage after things came to a halt at around 10-12 hours before the dowel move. As of today, I was able to complete the stage at 48 hours, with just a minor tweak. More below. Moving the dowel was not a big issue. It's held to the base with hot glue. All I did was use a razor and chisel to remove the glue off the base and dowel. If you're choosing to do this, your choice of tools may vary. Once the old glue was removed, it was time to move the dowel. Don't try to do this without the machine running. A fully loaded barrel in the frame with the machine running will make this task much more easy. Besides, you'll need to see how material circulates in different dowel positions, so the machine will have to be turned on. My stock machine's dowel was 1/2" from the vertical upright of the barrel frame. When I informally surveyed folks about their machines, the dowel was sometimes 1/8" from the upright. Some were a bit more. But, of all the folks I had contact with, mine was the furthest away out of any of them. Once I removed all existing hot glue, I turned on the machine and started to move the dowel closer to the vertical upright. Surprisingly, each incremental move did not come with a corresponding increase in barrel circulation. Sometimes there was an increase; sometimes there was a stall in movement. I ended up picking a spot for the dowel being about 1/8" from the vertical upright. This is quite significant from where my dowel was originally placed. I should note that once I moved my dowel from the original location, the noise became louder. That left me wondering if there is a "sweet spot" where the Lot-O folks are looking for noise and vibration reduction, as opposed to evaluating how well things are actually circulating. So, as it stands now, I was able to get through a complete polish stage (after moving the dowel) where I couldn't do that before. However, with the increased noise, which I'm assuming corresponds to vibration amplitude being increased, I'm wondering how long my springs will last. Maybe with the increased amplitude will come increased work hardening or fatigue- which may cause early breakage of the springs. So, that's it for now. You need a scorecard yet? |
|
|
|
Post by Admin on Oct 13, 2021 12:02:31 GMT -7
My bet is on the dowel placement. I just feel bad for anyone who buys a poorly tuned Lot-O but doesn’t have a support group or a video to realize that it is not working properly. Who would ever think to move the dowel? |
|
|
|
Post by Admin on Oct 13, 2021 12:04:35 GMT -7
How fitting I should happen upon this post...I have the exact condition as you experienced. My single Lot-O struggles to move material before I add borax and polish, seems fine after that for 12 or so hours, then gets constipated regardless of how much or little water I spritz in there. I have just been doing 12hr clean-outs, not that recharging a 1/2 tsp of polish is breaking the bank, but I'd prefer to let it just run longer. After reading here, I cannot WAIT to try rotating the barrel 90deg and/or maybe playing around with the dowel location. Great post! Thanks, and good luck. Feel free to jump back in with your results. If you do move the dowel, simply use hot glue as was originally done. I just realized I forgot to mention that in my post above. |
|


