Post by 1dave on Aug 27, 2020 5:34:16 GMT -7
I need to get back here and edit this post.
After way too many moves, much of my equipment has gone the way of lost socks.
I just ordered a new tripod and mesh screen.
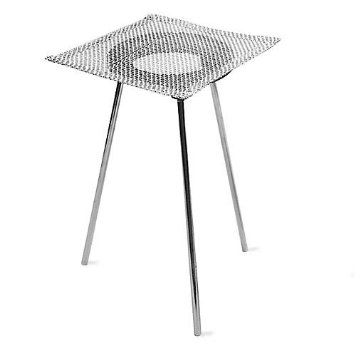
The best price I found was at:
www.limabeads.com/Tripod-Mesh-Screen-9-P20850?utm_source=amazon&utm_medium=cpc&utm_campaign=product_ads&utm_content=20850
$9.27 + $2.00 shipping!
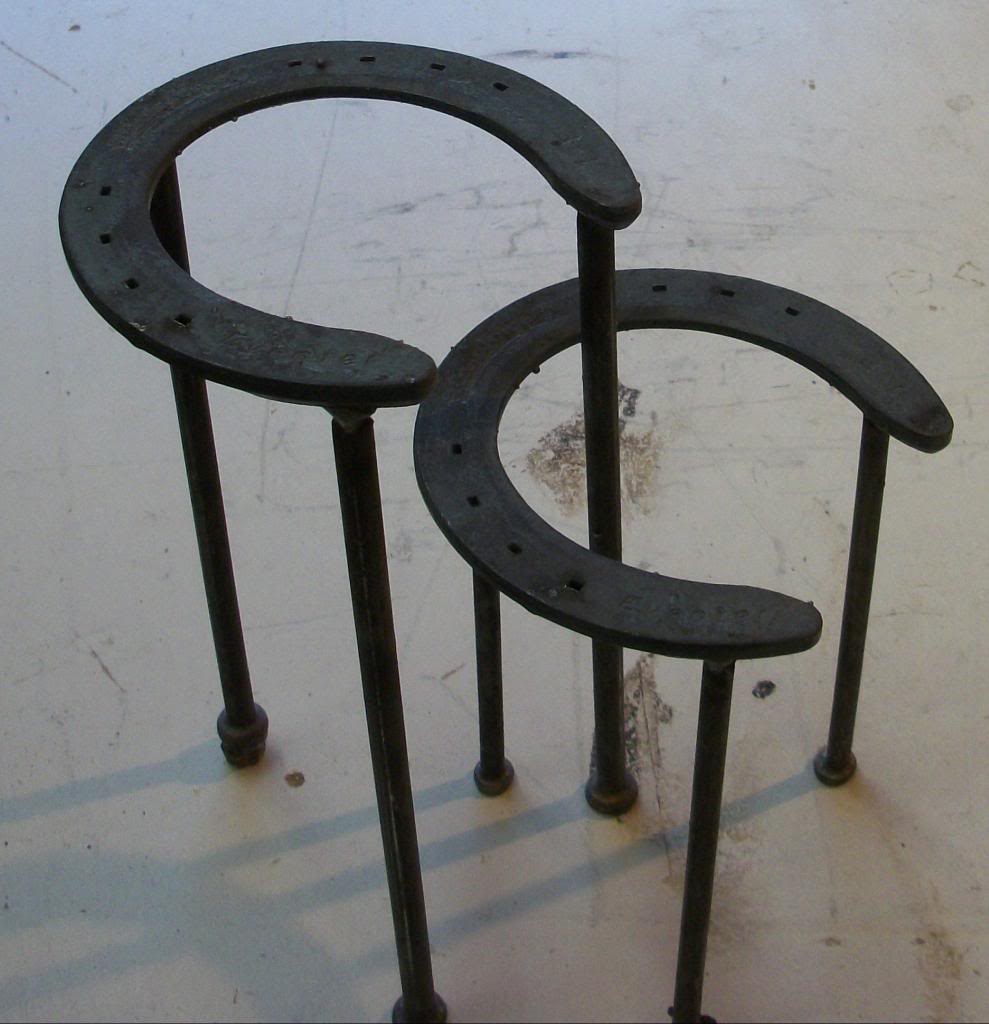
You can build your own from horseshoes and the largest nails available at your hardware store.
Lots of smiths solder on chunks of 2X4 or Charcoal blocks. Don't forget to quench after use!
Fire brick or coiled asbestos rolls are also used. For annealing, a cake pan or pie plate filled with pumice works well.
I prefer the Garnet Soldering Blocks made by J.B. Bown, apparently no longer available.
I hope someone takes up that production.
I just ordered a new tripod and mesh screen.
The best price I found was at:
www.limabeads.com/Tripod-Mesh-Screen-9-P20850?utm_source=amazon&utm_medium=cpc&utm_campaign=product_ads&utm_content=20850
$9.27 + $2.00 shipping!
You can build your own from horseshoes and the largest nails available at your hardware store.
Lots of smiths solder on chunks of 2X4 or Charcoal blocks. Don't forget to quench after use!
Fire brick or coiled asbestos rolls are also used. For annealing, a cake pan or pie plate filled with pumice works well.
I prefer the Garnet Soldering Blocks made by J.B. Bown, apparently no longer available.
I hope someone takes up that production.
A little Soldering Theory: As metals approach their melting point the crystal molecules move apart, providing microscopic space for other molecules to enter.
Hard soldering is the attempt to introduce an alloy that melts at that point and by moving into those spaces joins two pieces together.
Soft Soldering uses alloys that melt around 1/3 the melting point of the metal to be soldered.
It/s strength comes from it's ability to cling to CLEAN metal surfaces.
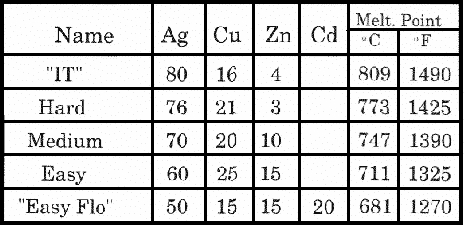
Available in your choice of sheet or wire, Silver Solder comes in at least three melting points:
German Silver, Nickel Silver, White Brass (Usually Cu 60%, Ni 20%, Zn 20%) has a melting point of up to 1450oC or 2642 oF which can not normally be achieved with a propane torch.
(or 75% copper and 25% nickel used in the United States nickel.)
Silver 999.9 fine Melting point: 960.5o, 1761oF
Sterling 92.5, Cu 7.5 Melting point: 893oC, 1640oF
Coin Silver 90, Cu 10 Melting point: 879oC, 1615oF
From some suppliers,
Hard Grade Silver Solder melts at 741° C, 1365° F - good to start projects.
Medium Grade Silver Solder melts at 691° C, 1275° F - good in middle of projects.
Easy flow - Easy Grade Silver Solder melts at 671° C, 1240° F - best to finish with so you don't mess up what has gone before.
I always bought sheet, cut it into 1/8" strips (still attached at the end) then into 1/8" squares (pallions) and kept them in an old cold cream jar.
I never thought about purchasing the wire form and rolling or hammering it flat, then cutting it into pallions. That may have been easier.
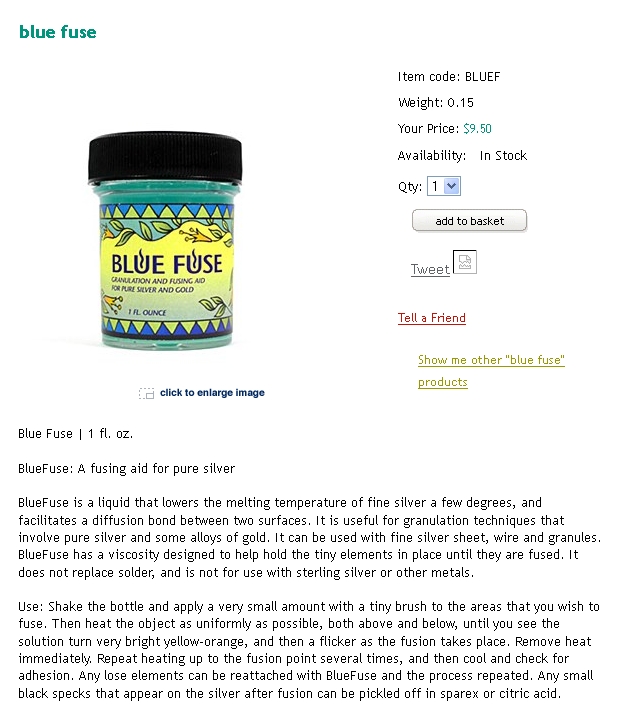
Fluxes:
Borax: melts at 75oC, 167oF Possibly the most commonly used flux world wide, available in the laundry isle of your grocery store.
Mix with water into a paste and use as needed. It provides oxide protection and leaves a glassy skin that is easily washed off.
Sparex #1 for ferrous metals
Sparex #2 for all non ferrous metals
Handy Flux, Battern's Flux, Boric Acid & Alcohol, Prips Flux, Cupronil, Hydrogen peroxidemix two parts hp with the same amount of Sparex 2 and one part water. Pickle first in Sparex, then in this mixture to remove any pink skin from brass.
Heat the metal and let the metal melt the solder. It is best to move the flame in circles so you don't melt a part. Solder will follow heat so you can heat from underneath and draw the solder into and along a joint.
With small projects a soldering iron may be sufficient. For larger projects you may prefer propane canisters, natural gas/air, oxy/propane, oxy/acetylene, or air/acetylene.

As the solder heats up it will pull into a ball. If the melted ball is hotter than the metal, it may jump away.
If the metal is hotter than the solder, the solder will ball up, then flatten out, more and more until it no longer holds the two parts together, but instead has just become a coating.
Troubleshooting
1. Incomplete or unsoldered joints: Metal was dirty, no flux, not enough heat, too much heat.
2. Solder balls up: Flame applied directly to the solder instead of the metal, metal or solder may be dirty, heat is flowing away from the joint.
3. Solder jumps to one side: One side is hotter than the other. Reflux and try again.

Nov 16, 2013 12:44:28 GMT -7 @pat said:
Years ago, I took the Norris class. It was awful! I suggest another book: Soldering Made Simple: Easy techniques for the kitchen-table jeweler.
By Joe Silvera. He has his own school in Berkeley.
Nov 16, 2013 13:27:36 GMT -7 @gemfeller said:
It's just my opinion based on personal experience but I think soldering silver can be a big challenge for beginners. Soldering gold is simple in comparison IMO. Silver requires that the entire workpiece reach soldering temperature, not just the area to be soldered. That involves careful torch work and heat control as well as pre-planning if you're working on a piece that combines multiple solder joints.I'm not familiar with the Silvera book but I'll strongly recommend one by Sara M. Sanford: "The Complete Guide to Jewelry Soldering: What Works, What Doesn't, and Why." Hard copies seem scarce based on my brief search but it's downloadable as an eBook from Lapidary Journal.
Rick
Nov 21, 2013 8:46:00 GMT -7 @connrock said:
I'm not a jeweler or an expert at silver soldering sterling silver bezel settings so take what I say with a grain of salt,,,,,,First off I'm self taught and learned everything the hard way by making a LOT of mistakes.
My first attempt at silver soldering sterling silver with an oxy/acet Smith's Little Torch was pretty funny!I cleaned and Handy Paste fluxed 2 very small pieces of 22 guage wire about 1/8" long and laid them side by side on my soldering board.I took a VERY small piece of hard solder and laid it so it was touching both pieces of the wire and started heating everything.First thing that happened was the flux started bubbling and "dancing" around and the 2 pieces of wire were moving in all directions and,,,,the solder was gone,,,,somewhere but it was gone!During this whole fiasco I kept the flame on the silver and the next thing I know,,,the silver is gone too!POOF,,,Gone! LOL Like I said,,,I learned the hard way!
As time went on I managed to not have my solder and silver disappear on me and tried my hand at bezel settings!
Everything I read and all the videos I watched on Youtube led me trying to get a lot of very small pieces of solder to stay against the back plate of the setting and the bezel wire.Just putting all these pieces of solder in the setting and having them actually stay leaning against the 2 surfaces was VERY frustrating in itself but watching the pieces of solder jump out into nowhere-land faster then a cricket made my blood boil!
Eventually I figured things out but still got frustrated thinking there had to be a better way to do this.One day I was working on a setting and put WAY too much solder in.After hours of trying to grind and sand the solder out of the inside of the setting I ended up ruining the bezel wire and was thoroughly disgusted with the whole thing.
The next day as I sat looking at the mangled setting and the oval cab I thought to myself,,,"Why not just grind a little off of the edge of the bottom of the cab if there's too much solder in there?"
The way I do it now is to cut a very thin strip of hard solder,hold it with tweezers and "feed" the solder into the setting.I DO NOT "flood" the setting with solder and it's a little tricky to do but it's a lot better (for me) then trying to use all those small pieces of solder.
I'm pretty good at it now and VERY,VERY rarely have to grind the edge on the bottom of a cab.
What are your thoughts on this method?
connrock
Nov 24, 2013 12:02:12 GMT -7 @tony said:
Tom/connrock is my guru. He's taught me everything I didn't teach myself, and occasionally I get something right...not his fault I'm not 100 percent perfect...totally mine  It took me a good year to figure out how to get soldering right, because I'm color blind, and can't fully see the color of the metal, or the flame to know where I stand. I have to go by an inner clock now, but I rarely melt silver like I used to. Poor Tom was at his wits end as to how to help me, but with all things practice makes perfect, and if you want it bad enough, and keep trying, no matter how frustrated you become, or your guru becomes..and calls you names, lol, you can figure it out. The trick to successful smithy work is never give up!! Practice, practice, practice, and don't be too hard on yourself. Tony