

Post by Admin on Aug 29, 2020 4:31:19 GMT -7
Introducing the new "Upload File" button for CLOUDINARY when posting, replying, and quick-replying on the Crosby Family Forum.

We are excited to introduce the Upload File button to our forum members as the very first Proboards forum integrated 3rd party solution for easy drag and drop uploading of photos into your new threads, reply posts, and quick replies on the forum. We are now using a Proboards sanctioned plugin to integrate the Cloudinary interface here on the forum, which means that our members (with a Cloudinary account) can now drag and drop a nearly unlimited amount of photos directly into your new posts from your computer, phone (in desktop view), tablet or other device.
As a side note, the feature is not currently working in "Quote" but we'll keep an eye out for updates from Proboards and hope they will fix this as soon as possible.
Cloudinary is a cloud based 3rd party photo hosting program that offers a very generous "free" photo hosting account just for signing up, along with several other business subscription account options. All of your photos uploaded on the RTH Forum are stored and easily managed by you on the rich and vibrant Cloudinary program platform.
In order to use this exciting new program, each member will need to visit the Cloudinary website and sign up for an account. From signing up an account on Cloudinary, you will receive two pieces of information you must enter in your Crosby profile settings; your Cloudinary Cloud Name and Cloudinary Upload Preset, both of which are automatically assigned by Cloudinary when you sign up.
What follows here is a basic tutorial which should help you to easily achieve this goal. With your feedback, this tutorial will be improved and polished as we go.
The summary of steps are as follows:
1. Visit your Crosby forum profile and click on the "Edit Profile" button.
2. Click on the "Settings" tab.
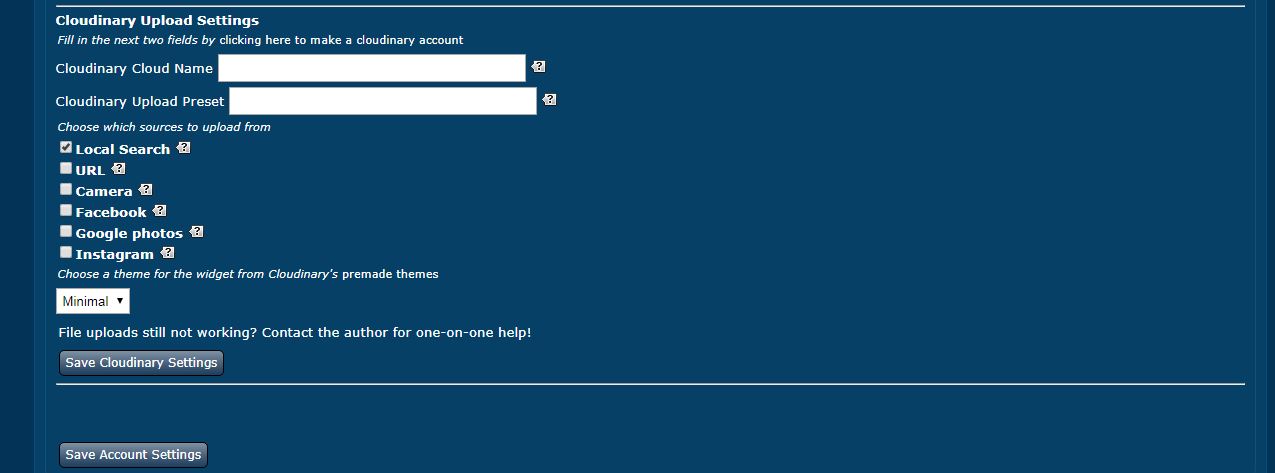
3. Scroll down to the new area titled "Cloudinary Upload Settings."
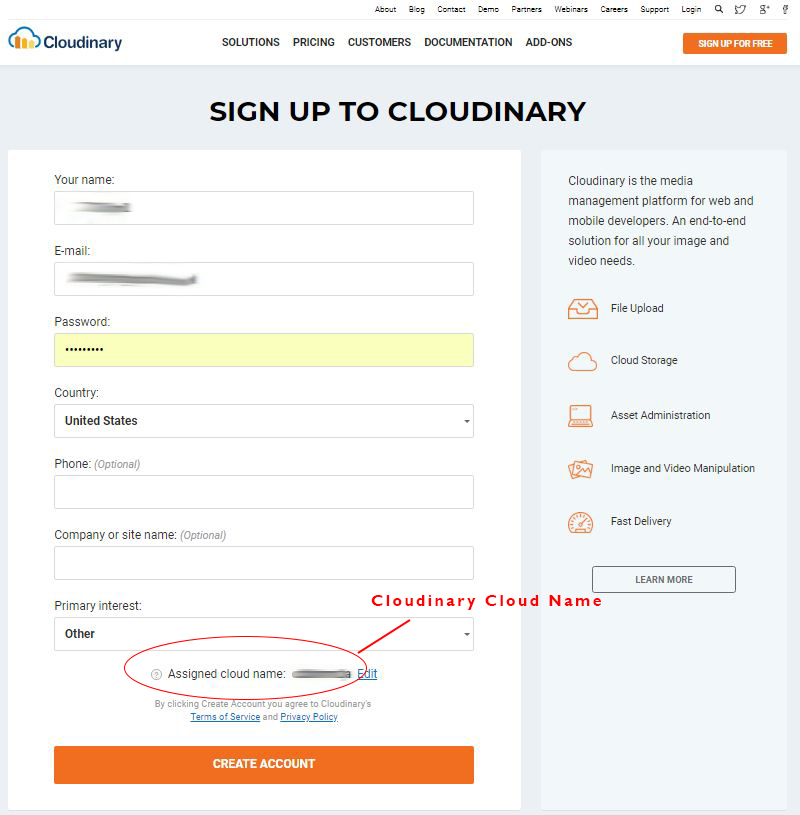
4. If you do not already have a Cloudinary account, click on the link titled "Fill in the next two fields by clicking here to make a cloudinary account."
5. At the Cloudinary website, enter your basic information, and create an account. Make a note of your Cloudinary Cloud Name automatically assigned by the program. This is the first piece of information you will need to enter in your profile settings on Crosby.
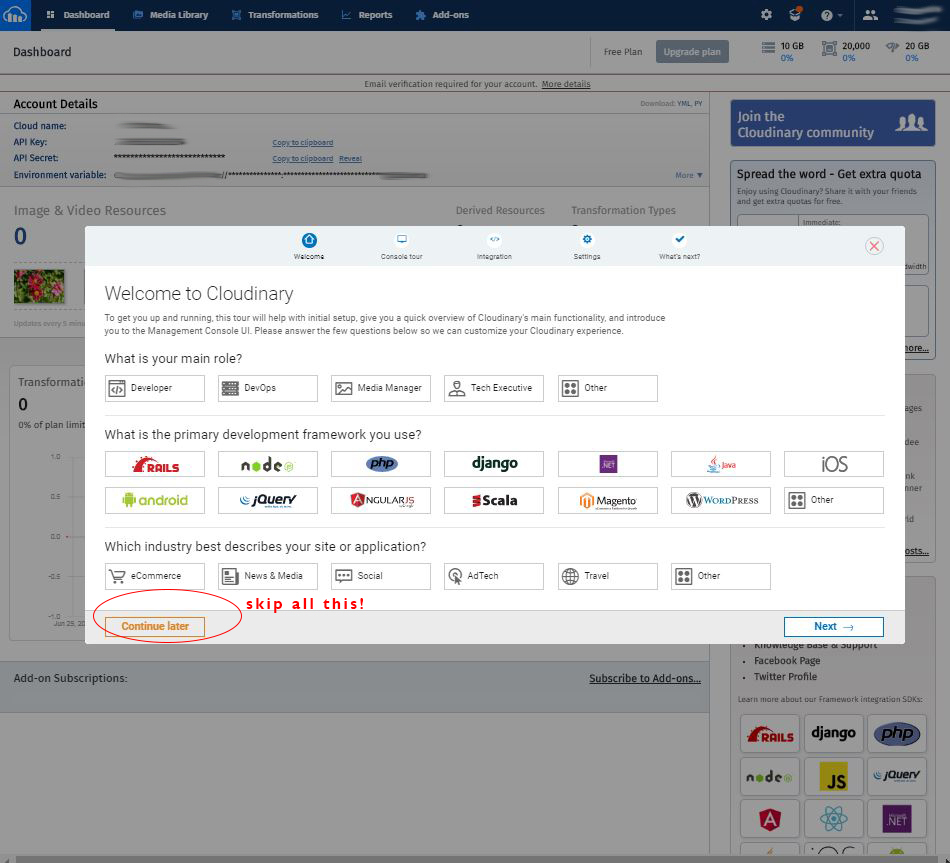
6. At the pop-up role page that comes up next you can chose "continue later" to skip past this part and go straight to the dashboard. I went through it and marked "other" to most of the questions.
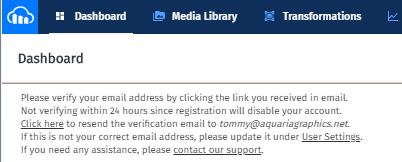
7. Near the top center of the page you will see a notice saying "email verification required." You must verify your email by going to your email inbox and reponding to the email verification request from Cloudinary. If you don't verify your email within 24 hours your account will be disabled. If you cannot find the email from Cloudinary in your mailbox be sure to check your spam filter. If you still don't find it you can follow the information on the Cloudinary site to generate a new verification email.
8. Once your email is verified, return to the Cloudinary dashboard.
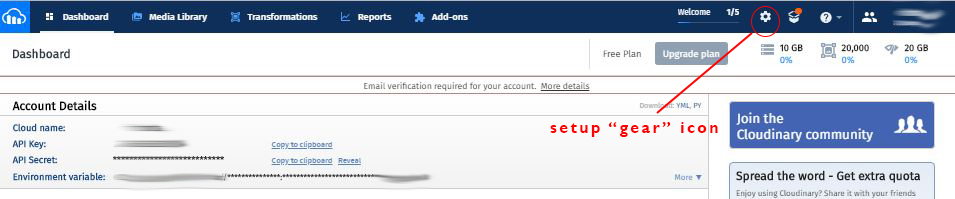
9. Click on the gear icon near the top right for "Settings."
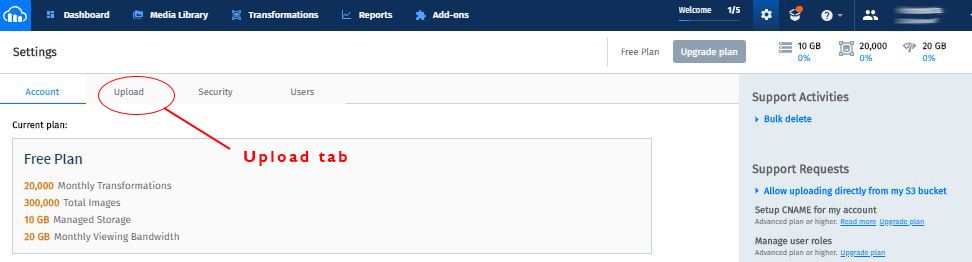
10. Click on the Upload tab.
11. Scroll down and click on "Enable unsigned uploading."

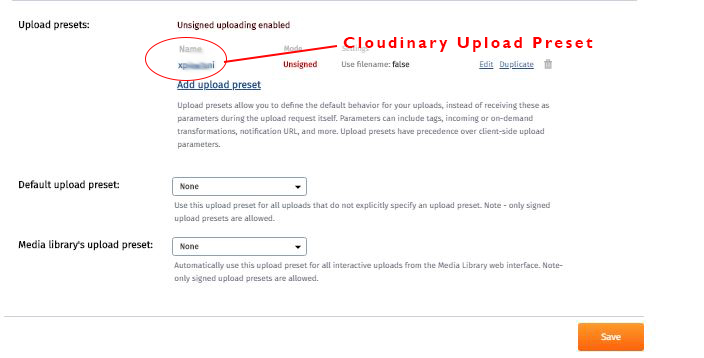
12. You're almost done!! At this point, make a note of your Cloudinary Upload Preset automatically assigned by the program. This is the second piece of information you must have to enter in your profile settings on Crosby.
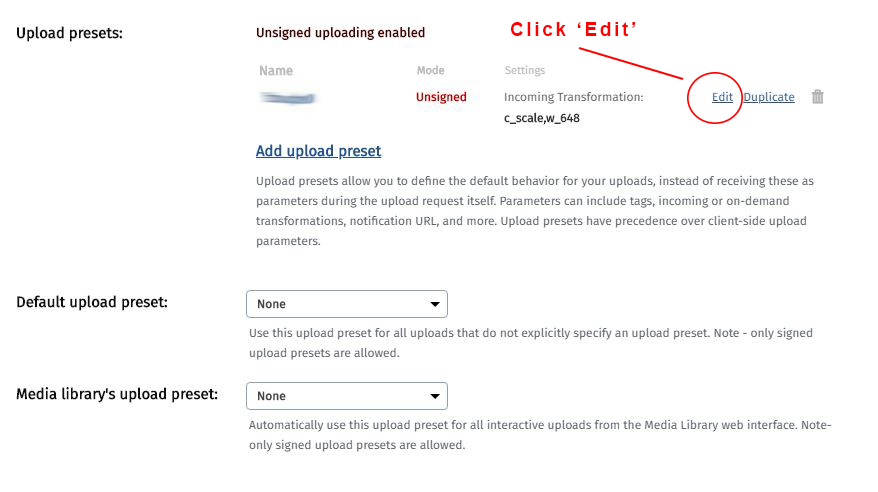
13. Click 'edit' to make changes to your Cloudinary Upload Preset.
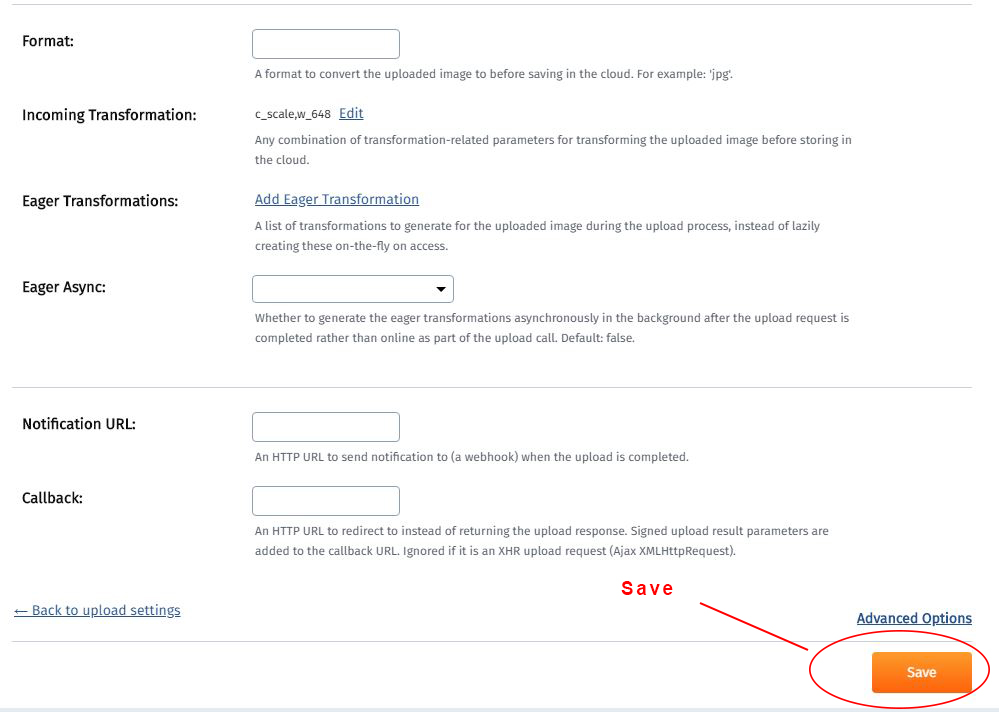
14. Scroll down to "Incoming Transformations" and click on "Edit."

15. Set the slider to your desired image width (we highly recommend 800 pixels or smaller) and click "OK".
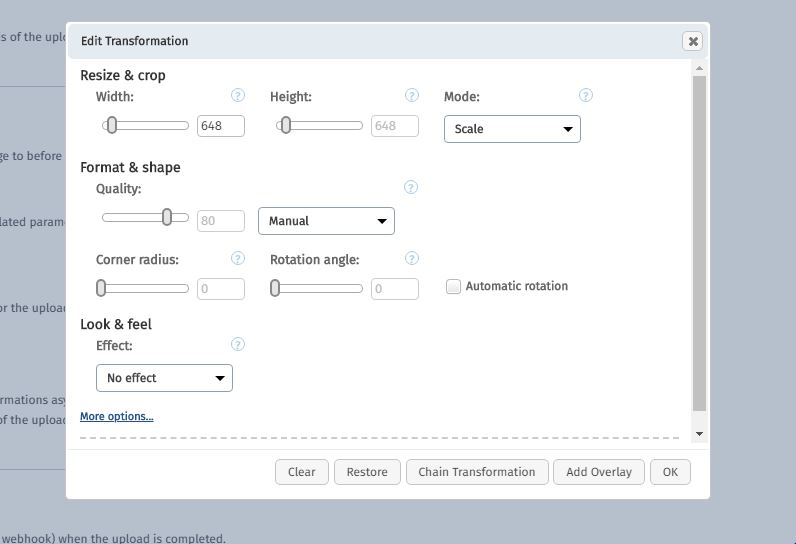
16. Click "save."
17. Return to your RTH profile > Edit Profile > Settings Tab - and enter both your Cloudinary Cloud Name and Cloudinary Upload Preset into each respective field.
18. Choose which sources you will be able to upload from by clicking the check boxes. At the very minimum you must check "local search" to be able to upload photos from your computer.
19. Click "Save Cloudinary settings."
20. Click "Save Account Settings."
Once you have done all of these steps correctly you will now be able to click on the "Upload File" button when creating a new thread, posting a reply, or posting using the quick reply box. Clicking the Upload File button will take you to the Cloudinary/RTH interface page where you can easily drag and drop photos directly into your posts.
Thanks for being a Crosby Family Forum community member and enjoy this new program. Any questions you have, or if you need help please post in the Technical help section of the forum.
We are excited to introduce the Upload File button to our forum members as the very first Proboards forum integrated 3rd party solution for easy drag and drop uploading of photos into your new threads, reply posts, and quick replies on the forum. We are now using a Proboards sanctioned plugin to integrate the Cloudinary interface here on the forum, which means that our members (with a Cloudinary account) can now drag and drop a nearly unlimited amount of photos directly into your new posts from your computer, phone (in desktop view), tablet or other device.
As a side note, the feature is not currently working in "Quote" but we'll keep an eye out for updates from Proboards and hope they will fix this as soon as possible.
Cloudinary is a cloud based 3rd party photo hosting program that offers a very generous "free" photo hosting account just for signing up, along with several other business subscription account options. All of your photos uploaded on the RTH Forum are stored and easily managed by you on the rich and vibrant Cloudinary program platform.
In order to use this exciting new program, each member will need to visit the Cloudinary website and sign up for an account. From signing up an account on Cloudinary, you will receive two pieces of information you must enter in your Crosby profile settings; your Cloudinary Cloud Name and Cloudinary Upload Preset, both of which are automatically assigned by Cloudinary when you sign up.
What follows here is a basic tutorial which should help you to easily achieve this goal. With your feedback, this tutorial will be improved and polished as we go.
Basic Tutorial
The summary of steps are as follows:
1. Visit your Crosby forum profile and click on the "Edit Profile" button.
2. Click on the "Settings" tab.
3. Scroll down to the new area titled "Cloudinary Upload Settings."
4. If you do not already have a Cloudinary account, click on the link titled "Fill in the next two fields by clicking here to make a cloudinary account."
5. At the Cloudinary website, enter your basic information, and create an account. Make a note of your Cloudinary Cloud Name automatically assigned by the program. This is the first piece of information you will need to enter in your profile settings on Crosby.
6. At the pop-up role page that comes up next you can chose "continue later" to skip past this part and go straight to the dashboard. I went through it and marked "other" to most of the questions.
7. Near the top center of the page you will see a notice saying "email verification required." You must verify your email by going to your email inbox and reponding to the email verification request from Cloudinary. If you don't verify your email within 24 hours your account will be disabled. If you cannot find the email from Cloudinary in your mailbox be sure to check your spam filter. If you still don't find it you can follow the information on the Cloudinary site to generate a new verification email.
8. Once your email is verified, return to the Cloudinary dashboard.
9. Click on the gear icon near the top right for "Settings."
10. Click on the Upload tab.
11. Scroll down and click on "Enable unsigned uploading."
12. You're almost done!! At this point, make a note of your Cloudinary Upload Preset automatically assigned by the program. This is the second piece of information you must have to enter in your profile settings on Crosby.
VERY IMPORTANT! The next step is highly recommended for everyone, especially if your camera or cell phone is set to take large high resolution photos. Please go in now and set your "Incoming Transformations" to reduce the size of images being stored on Cloudinary. Failure to do so will result in massive digital camera sized photos being stored on Cloudinary and served into your posts potentially thousands of times. From personal experience, this will result in rapid depletion of your allotted bandwidth.
(Need to add recommended file size - 800 X 600 96 Resolution ?)
If you have already exited the program and are coming back in to edit your "Incoming Transformations," the steps to reach this point of the tutorial from the Cloudinary dashboard are: click the gear icon in the upper right, then click upload tab and scroll down to 'Upload Presets" and click 'Edit'
13. Click 'edit' to make changes to your Cloudinary Upload Preset.
14. Scroll down to "Incoming Transformations" and click on "Edit."
15. Set the slider to your desired image width (we highly recommend 800 pixels or smaller) and click "OK".
16. Click "save."
17. Return to your RTH profile > Edit Profile > Settings Tab - and enter both your Cloudinary Cloud Name and Cloudinary Upload Preset into each respective field.
18. Choose which sources you will be able to upload from by clicking the check boxes. At the very minimum you must check "local search" to be able to upload photos from your computer.
19. Click "Save Cloudinary settings."
20. Click "Save Account Settings."
Once you have done all of these steps correctly you will now be able to click on the "Upload File" button when creating a new thread, posting a reply, or posting using the quick reply box. Clicking the Upload File button will take you to the Cloudinary/RTH interface page where you can easily drag and drop photos directly into your posts.
Thanks for being a Crosby Family Forum community member and enjoy this new program. Any questions you have, or if you need help please post in the Technical help section of the forum.


